Coconut Lime Bars
** Before I get to today’s recipe, I just want to say THANK YOU for all the heartfelt messages to our big announcement earlier this week. This soon-to-be momma is feeling all the love and teared up reading your comments on the blog and Instagram. Thank you!! **

SO these coconut lime bars are super amazing!! Sometimes it’s just hard to beat around the bush when a recipe is good. I love lemon bars but man…lime bars are where it’s at now because you know coconut and lime = fab!! I’ve had great love for the coconut- lime combo all spring long (exhibit 1, 2, 3) and couldn’t wait to have it again. When thinking of a possible dessert for Mother’s Day, I figured we should shower our citrus loving moms with more than just lemon desserts….lime bars with tropical coconut sounds befitting to celebrate these hardworking women. Right?

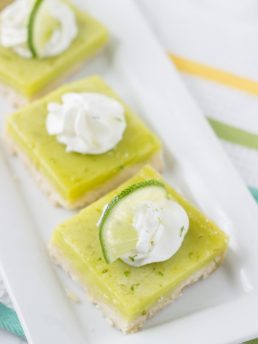
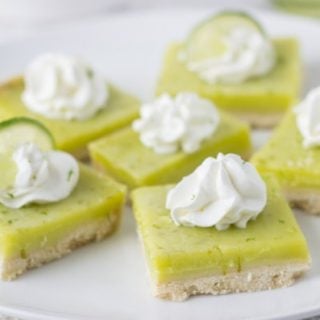
These coconut (key) lime bars start with a super soft, crumbly, and buttery coconut shortbread crust that’s crunchy and really good. They are then topped with sweet and tart lime curd, just like in your traditional lemon bars with hints of coconut. You can use regular limes for this recipe or fresh key lime juice if you can find those little key limes around. Finally the bars are topped with fresh whipped coconut cream. In summary, these are super duper amazing treats my friends.

OK, I’ll stop the blabbing and just give you the recipe so you can try them yourselves. I’m sharing these coconut lime bars over on The Kitchenthusiast, the KitchenAid recipe blog!
I hope you have a wonderful weekend. Happy Mother’s Day to all you mommas out there…and THANK YOU for all you do!
Coconut Lime Bars
Ingredients
For the Shortbread Crust:
- 1 cup all-purpose flour
- 1/4 cup powdered sugar
- 1 tablespoon cornstarch
- Pinch of salt
- 1/4 cup unsweetened coconut flakes
- 1/2 cup unsalted butter, at room temperature, cut into 6 pieces
For Filling:
- 3 large eggs
- 1 cup granulated sugar
- 1 teaspoon fresh key lime zest, finely grated
- 1/3 cup freshly squeezed lime juice
- 2 tablespoons heavy cream (or coconut cream)
- 1 teaspoon coconut extract
- 1/4 cup all-purpose flour
For Topping:
- 1 cup cold heavy cream
- 1 teaspoon coconut extract
- 1/4 cup powdered sugar"
Instructions
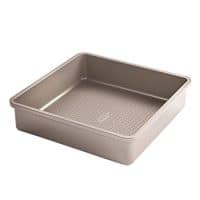
- Preheat oven to 350 degrees F. Grease a Nonstick 9” x 9” Square Pan (or 8×8 square pan) with baking spray, line with parchment paper and grease parchment with baking spray.
- In the bowl of a food processor, combine all the ingredients for the crust, except the butter. Pulse until well combined. Add the butter pieces and pulse until the crust starts to come together (will look like wet sand).
- Turn dough out into the prepared pan. Using your fingers, press evenly into the bottom of the pan.
- Bake crust for 10 minutes or until slightly brown around the edges. Remove from the oven until filling is ready.
- While the crust is baking, prepare the filling. In a large bowl, whisk together the eggs and granulated sugar until thickened, about 2-3 minutes. Whisk in the rest of the ingredients for the filling and mix until combined and thickened.
- Pour the filling into the warm baked crust and bake for 18 to 20 minutes. Remove from heat and let cool completely to room temperature on a wire rack.
- Chill bars for at least 2 hours or overnight before cutting.
- To serve, use a sharp knife to cut into about 9 bars. Whip the heavy cream, coconut extract, and powdered sugar until soft peaks form. Top each bar with coconut whipped cream and fresh lime zest.
- Store leftovers in an airtight container in the refrigerator.
Recommended Products
As an Amazon Associate and member of other affiliate programs, I earn from qualifying purchases.

Xoxo…
I cannot get to the recipe. Is there anyway I can get the recipe? I have an apple notebook and Safari/Google are blocking me. Thanks for the response in advance.
I love lemon, but I have a “thing” for lime! And you know how I feel about coconut! I just love these bars.
They look mouthwatering!!!
Thanks!!
Congratulations Zainab! Such sweet news. 🙂 These bars look FAB. I love coconut and lime together. Craving these!!
Thanks Alyssa!!
I can’t believe I missed your announcement! Congrats! Kids are such a huge blessing! Loving these bars — pinning for sure!
Thanks Ashley!!
Congrats again! Have a great mother’s day 🙂 These bars look amazing! Coconut and lime is such a great combo and these look so perfect 🙂
Thanks Medha!!
These bars look absolutely incredible, Z! I love the coconut and lime combo and the color is so pretty! Aaw so so excited for you, have a wonderful weekend! xo
Thanks Kelly! Happy Mother’s Day!
Z, these coconut lime bars are GORGEOUS!!!!! and YOU will be celebrating Mother’s Day next year. . with your little nugget. . SO HAPPY for you!
Thanks Alice!! Have a great weekend!!
Coconut and lime? Girl genius. I love that you punched up the flavor on standard lemon bars. You knocked this out.
Seriously, limes are like for real!!!
Lime is one if the best flavours ever – I will happily substitute it everywhere lemon is found!
I agree!! Thanks Kearin!
Sounds like I missed a big announcement…congratulations! Being a mom is the best job, ever 🙂 These coconut lime bars look to die for! I love their pretty green color!
Thanks Denise!!